1. 소개
1.1 개요
GCAN-302는 CANopen 슬레이브 및 이더넷 컨버터입니다. GCAN-302의 CAN 쪽은 CANopen 슬레이브 프로토콜을 통합합니다. GCAN-302는 CANopen 슬레이브 프로토콜 신호를 이더넷 신호로 변환하거나 이더넷 신호를 CANopen 슬레이브 프로토콜 신호로 변환합니다. 이 컨버터를 사용하면 CANopen 마스터 프로토콜을 사용하는 디바이스가 하드웨어 아키텍처를 변경하지 않고도 이더넷에 연결할 수 있으며, CAN 버스 어플리케이션의 범위를 확장할 수 있습니다.
참고: CAN-302는 사용자 지정이 필요합니다.
1.2 속성 한눈에 보기
1.2.1 하드웨어
고속 32비트 프로세서
임베디드 하드웨어 워치독 타이머
전원 공급 장치 전압: DC24V, 최대 전류: 40mA
정전기 방전 내성 수준: 접촉 방전 ±2KV, 공기 방전 ±15KV
전기적 고속 과도 버스트 내성 수준: ±1KV
서지 내성 수준: ±1KV
작동 온도 범위: -40℃~+85℃
작동 습도 범위: 5%~95% RH 결로 없음
치수: 크기: 113mm * 100mm * 21mm
산업 디자인을 위해 설계된 표준 DIN 레일 마운팅
1.2.2 CANopen
터미널과 통합된 1개의 CAN-Bus 인터페이스
CAN-Bus 신호에는 다음이 포함됩니다: CAN_H, CAN_L, CAN_GND
CAN-Bus 절연 컨버터 절연 전압: DC1500V
CANopen은 CAN2.0A 프레임 포맷을 지원하며 NMT, PDO, SDO, 하트비트, 가드라이프, SYNC를 지원합니다.
CANopen 전송 속도 범위: 10Kbps ~ 1Mbps
CANopen 노드 번호 지원 1~127
1.2.3 이더넷
RJ45, 10 / 100M 적응형 지원
정적 또는 동적 IP 액세스 지원
하트비트 및 타임아웃 인터럽트 기능 지원
작업 포트, 대상 IP 및 대상 포트를 설정할 수 있습니다.
네트워크 연결이 끊어지면 연결 리소스가 자동으로 복원되고 TCP 연결이 안정적으로 설정됩니다.
지원 프로토콜에는 EtherNET, ARP, IP, ICMP, UDP, DHCP, DNS, TCP가 포함됩니다.
호스트 컴퓨터 통신 소프트웨어는 소켓 작업(TCP 서버, TCP 클라이언트, UDP 등)과 호환되며, 표준 소켓 규칙을 따릅니다.
2. 설치
2.1 설치 및 고정
GCAN-302는 그림 2.1과 같이 DIN 레일에 설치할 수 있습니다.
CAN_H와 CAN_H만 서로 연결한 다음, CAN_L과 CAN_L이 서로 연결합니다. 그런 다음 연결을 설정합니다.

그림 2.1 GCAN-302 모듈 설치
참고: DIN 레일은 접지선으로 연결해야 합니다.
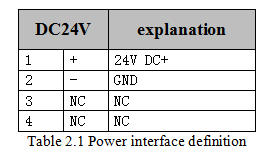
GCAN-302 전원 인터페이스 정의는 표 2.1에 나와 있습니다.
2.2 PC에 연결
네트워크 케이블로 변환기를 컴퓨터에 연결합니다. 그러면 GCAN-302 LAN 인터페이스가 통신을 설정할 수 있습니다.
2.3 CANopen에 연결
GCAN-302의 CAN 측에 대한 핀 정의는 표 2.3에 나와 있습니다.

CAN_H와 CAN_H만 서로 연결한 다음, CAN_L과 CAN_L이 서로 연결합니다. 그런 다음 연결을 설정합니다.