4. TCP 형식
4.1 CANopen 슬레이브→이더넷(RPDO)

4.2 이더넷→CANopen 슬레이브(TPDO)
5. 구성 지침
GCAN-302 컨버터는 작동 모드, 작업 포트, 대상 포트, 대상 IP, CAN 작동 모드, CAN 전송 속도와 같은 기본 파라미터를 포함하여 "TCP-CANopen Config" 소프트웨어를 사용하여 구성할 수 있습니다.
5.1 GCAN-302 컨버터를 컴퓨터에 연결합니다.
변환기의 전원을 켜고 네트워크 케이블로 변환기를 컴퓨터에 연결합니다. "TCP-CANopen Config" 소프트웨어를 엽니다. GCAN-302의 IP 주소를 입력하고 "연결"을 클릭합니다.
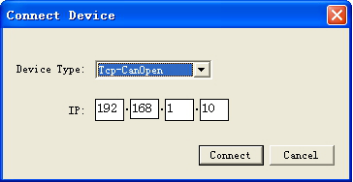
"연결"을 클릭하면 다음과 같은 소프트웨어 인터페이스가 나타납니다.

"연결"-- 변환기 연결
"업로드"-변환기에서 구성 정보를 읽습니다.
"다운로드"-컨버터 플래시에 구성 정보를 다운로드합니다.
"열기"- PC에서 구성 정보 파일을 열고 읽습니다.
"다른 이름으로 저장"-구성 정보 파일을 컴퓨터에 저장합니다.
"UpData 앱"-GCAN-302 펌웨어 커널을 업그레이드합니다. (이 기능은 안내에 따라 사용하세요)
5.2 기본 정보
연결이 성공하면 "업로드"를 클릭하여 변환기의 매개변수를 컴퓨터에 업로드합니다.

"IP 주소 정보"-GCAN-302 IP 주소 설정
"게이트웨이"-GCAN-302 게이트웨이 설정
"서브넷 마스크"-GCAN-302 서브넷 마스크 설정
"Can Baudrate"- CAN-Bus 통신 전송 속도 설정
"노드 ID"- CANopen 측의 노드 ID 번호를 설정합니다.
"CAN 전송 속도"는 CAN-Bus의 전송 속도를 설정할 수 있으며, 해당 표는 다음과 같습니다:
5.3 GCAN-302의 플래시로 다운로드하기
구성이 완료되면 사용자는 '다운로드'를 클릭하여 변환기 플래시에 데이터를 쓸 수 있습니다. 데이터가 성공적으로 기록되면 새 설정을 활성화하려면 전원을 다시 켜야 합니다.

참고: 다운로드가 완료된 후 전원을 다시 켜면 새 구성이 적용됩니다.
5.4 GCAN-302 업그레이드(안내에 따라 이 기능 사용)
업그레이드가 필요한 경우 문의해 주세요.