4. Format TCP
4.1 Esclave CANopen→Ethernet(RPDO)

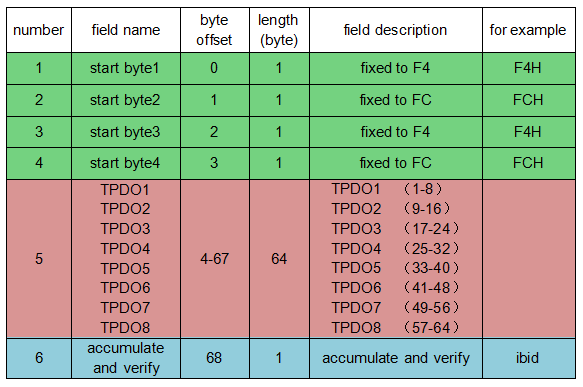
4.2 Ethernet→CANopen esclave(TPDO)
5. Instructions de configuration
Le convertisseur GCAN-302 peut être configuré à l'aide du logiciel "TCP-CANopen Config", y compris les paramètres de base tels que le mode de fonctionnement, le port de travail, le port cible, l'IP cible, le mode de fonctionnement CAN, la vitesse de transmission CAN.
5.1 Connecter le convertisseur GCAN-302 à l'ordinateur
Mettez le convertisseur sous tension et connectez-le à l'ordinateur à l'aide d'un câble réseau. Ouvrez le logiciel "TCP-CANopen Config". Entrez l'adresse IP du GCAN-302 et cliquez sur "Connect".
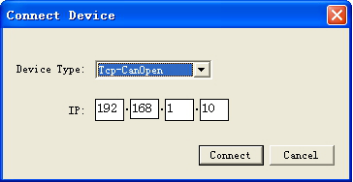
Cliquez sur "Connect", et l'interface suivante du logiciel apparaîtra.

"Connecter"--connecter le convertisseur
"Upload" -- lire les informations de configuration dans le convertisseur
"DownLoad" - téléchargement des informations de configuration dans la mémoire flash du convertisseur.
"Ouvrir"--ouvrir et lire le fichier d'information de configuration sur le PC
"SaveAs"-enregistre le fichier d'informations de configuration sur votre ordinateur
"UpData App"-mettre à jour le noyau du micrologiciel du GCAN-302. (Veuillez utiliser cette fonction sous contrôle)
5.2 Informations de base
Une fois la connexion établie, cliquez sur "UpLoad" pour télécharger les paramètres du convertisseur sur l'ordinateur.

"IP Address Info" - Définir l'adresse IP du GCAN-302
"GateWay"-définir la passerelle GCAN-302
"Masque de sous-réseau" - définit le masque de sous-réseau du GCAN-302
"Can Baudrate" - définit le débit en bauds de la communication CAN-Bus.
"Node ID" - définit le numéro d'identification du nœud du côté CANopen
"CAN Baud rate" permet de régler la vitesse de transmission du CAN-Bus, le tableau correspondant est le suivant :
5.3 Téléchargement sur la mémoire flash du GCAN-302
Lorsque la configuration est terminée, l'utilisateur peut cliquer sur "DownLoad" pour écrire les données dans la mémoire flash du convertisseur. Lorsque les données sont écrites avec succès, vous devez réalimenter l'appareil pour activer les nouveaux paramètres.

Remarque : une fois le téléchargement terminé, rallumez l'appareil pour que la nouvelle configuration prenne effet.
5.4 Mise à niveau du GCAN-302 (utiliser cette fonction à titre indicatif)
Si vous avez besoin d'une mise à niveau, veuillez nous contacter.